

![[Company Logo Image]](../images/sphere_smooth.gif)
|
|
|
|
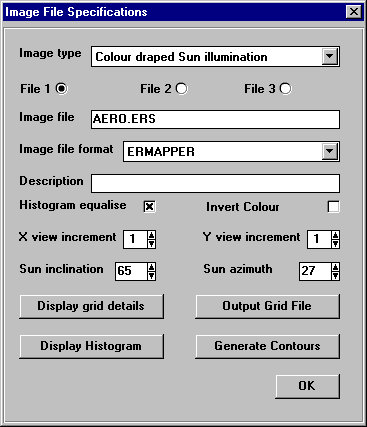
WinDisp Image MenuSamples : Greyscale , Colour , Banded Colour , Realtime Sun Illumination , Colour draped Sun Illumination , RGB , BIL/BIP,PCI The Image File Specification menu controls how an image is to be displayed and also provides facilities to determine the distribution of data in the image along with options for converting the image to a number of different formats and for generating contours for the currently defined image. The default menu displayed when the Image menu item is clicked is as follows:
Image TypeThe primary item defining the display of the image is the Image Type drop-down box. The options available are:
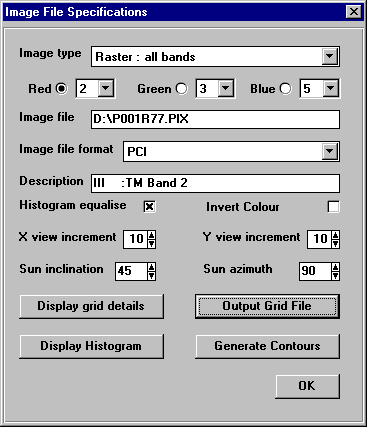
Grey Scale If this option is selected, the image files (up to three are permitted) are read, merged using a histogram matching of the areas of overlap and the image displayed using a greyscale palette. Colour This option functions in the same fashion as the Grey Scale option except that the image is displayed using a colour rainbow palette. Only numerical grid files (ie not BIL or BIP) are meaningful when using this option. Banded Colour This option functions in the same fashion as the Grey Scale option except that the image is displayed using a colour lookup table defined in the Colour Legend Menu in the Frame Specification Menu. Only numerical grid files (ie not BIL or BIP) are meaningful when using this option. Real-time Sun illumination This option functions in the same fashion as the Grey Scale option except that before the image is displayed the sun illumination is computed (and stored in a file with the suffix "sun" to allow for multiple use - this file may be deleted to save space if it is no longer required). Once the sun illumination file has been set up, the greyscale image corresponding to the values specified in the Sun Inclination and Azimuth text boxes is displayed and a sun illumination sphere is displayed in the upper left corner of the graphics window. Clicking anywhere on the sphere will cause the appropriate inclination and azimuth values to be computed and the image redisplayed using the new values. These new values will be displayed in the status boxes in the lower left corner of the graphics window and will also replace the current values in the Image Specifications Menu. Colour draped Sun illumination Once the appropriate Sun Inclination and Azimuth values have been specified, selecting the Colour draped Sun illumination option results in the image being displayed using the original data values in the grid files to determine the colour for each pixel and the sun illumination value being used to determine the intensity of the pixel. Colour drape This option is similar to the Colour draped Sun illumination option, except that it requires two grid files to operate. The first file is used to specify the colour for the image and the second file is used to determine the intensity. Only numeric grids can be displayed using this option and two grid files need to be specified. RGB This option is similar to the Colour drape option, except that it requires three grid files to operate. The first file is used to determine the red component of the image, the second file is used to determine the green component and the third file is used to determine the green component. Only numeric grids can be displayed using this option and three grid files need to be specified. Raster - all bands This option is provided for the display of raster based image files (such as BIL and BIP). When a raster image file such as IP, BIL (eg ArcView, SPOT) or PCI is selected the Image Menu has the form:
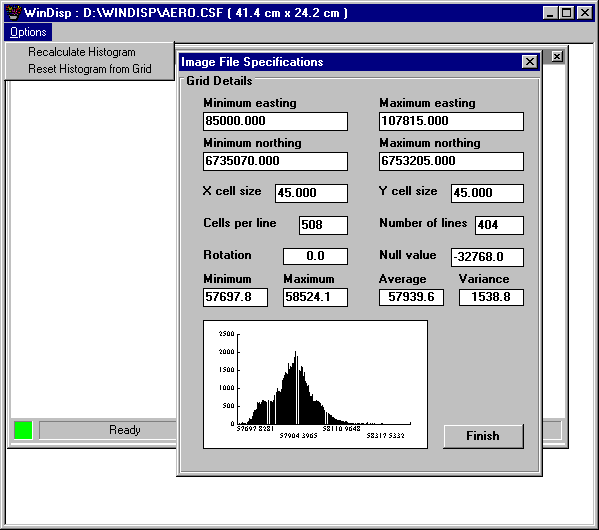
If the raster files has less than three bands, the image type is set to greyscale and either band may be selected and displayed. If there are three or more bands in the image, any of the available bands may be assigned to define the red, green and blue components of the image. File 1,2,3When displaying numeric grids up to three grid files may be specified. For RGB image styles three files are mandatory with the first grid being used to define the red component, the second defining the blue and the third defining the green. For Colour Drape two files must be supplied with the first being used to define the colour of the displayed image and the second being used to define the intensity. For the remaining numeric based grid options (ie all others except Raster: All Bands), if more than one grid file is specified a merged image grid is formed by histogram matching the second and third grids to conform to the first grid and then each grid is displayed using the combined histograms of all images. DescriptionWhen displaying PCI images, the description line is read from the header file and displayed in this text box. Invert ColourWhen this option is selected, the colour palette used in displaying the image is inverted, thus the greyscale goes from white to black and the colour palette goes from red to blue. This option has no effect on the Real-time or colour draped Sun illumination and banded colour options, but does invert the colour components for colour draped, RGB and Raster options. Histogram EqualiseWhen this option is selected (the default condition), the histogram of the image data is first computed and then a 4096 entry lookup table is computed to determine the histogram equalised value. The histogram is initially based on the limits determined when the grid file is read for the first time. This range is used as a first pass to determine the histogram, but as this can be badly affected by outliers in the data, the histogram is then truncated to the 95% limits and the histogram is then recomputed using these new limits. This process is repeated up to three times if the newly computed 95% limits are radically different from the initial data limits at any stage. Once the first histogram has been computed the range used for computing the histogram can be modified by the user by clicking on the Display Grid Details button to bring up the Grid Details menu. This has the following form:
The menu itself provides basic information on the area limits covered by the grid file, the cell size, the number of lines and cells per line. In addition the statistics for the grid data and a histogram are displayed. If the user wishes to highlight a particular data range in the image the minimum and maximum data values can be set appropriately and the histogram recomputed using these values. The effects of restricting the data range in this manner can be undone by either setting the minimum and maximum values back to their original values and then recomputing the histogram from the Options menu item, or by simply selecting the Reset Histogram from Grid menu item. Note that recalculation of the histogram has no effect for raster based images. If the Histogram Equalise option is turned off, the display of the image proceeds in the same fashion except that the grid data value is converted to a colour value by simple linear interpolation between the minimum and maximum grid data values. If the Minimum data value is specified as being smaller than the actual grid minimum or the Maximum specified to be larger than the grid maximum, this will have no effect if the Histogram Equalise option is turned on as the histogram calculation will simply treat these limits as outliers and eliminate them. However if the histogram is recomputed using limits outside the actual data range and the Histogram Equalise option is turned off, then the specified limits will be used for the transformation to colour value and so only a portion of the available colour range will be used in displaying the image. This option is useful for displaying a number of images using a fixed data range since then the images may be compared directly with one another as a particular colour will correspond to the same data value in each of the images. A similar strategy is available for histogram equalised images where the colour table for the primary image can be written out using the Save Colour Table under the Options menu. Once this table is written, it can then be read in for all subsequent images to be displayed using the Read Colour Table menu item and the same colour lookup will then be applied so that the same colour in all images will represent the same data value.
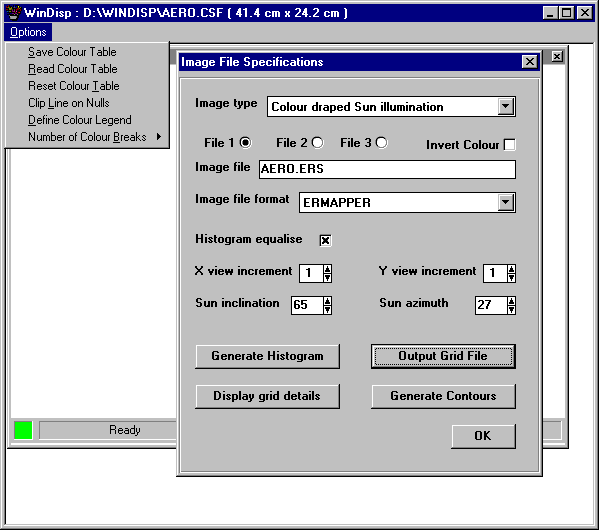
If a colour table is read in and found to be unsuitable, the Reset Colour Table menu item can be used to reset the colour table using the histogram for the currently specified grid files. There are a number of other useful features available from the Options Menu for the Image File Specifications form, these are: Clip Lines on Nulls This option only applies to printing of images using the PostScript File output option. Printing large files to a DesignJet printer via a PostScript file can be difficult due to memory limitations. This problem can be reduced for images which contain a large number of null values by turning on this menu item. When this option is turned on, only the non-null pixels for each line are output to the file thus reducing the overall plot file size when there are large numbers of null data values. Define Colour Legend By clicking on this menu item the current histogram is divided into the number of data ranges specified under the Number of Colour Breaks menu item (default is 8) and copied to the Colour Legend Range on the Frame Specifications form. This provides a simple means to generate a first approximation of the required data limits for displaying banded colour images where an effect similar to the Histogram Equalise option is desired. Number of Colour Breaks This menu item allows the user to specify the number of colour ranges to define for the Colour Legend Range on the Frame Specifications form. The available values for this item is in the range 2 to 8 with 8 being the default number. X View IncrementThe value specified in this text box is used when displaying the image to subsample the grid cells for each line. Specifying a value larger than 1 results in a coarser image but this also means the image is displayed more rapidly. Y View IncrementThe value specified in this text box is used when displaying the image to subsample the grid lines. Specifying a value larger than 1 results in a coarser image but this also means the image is displayed more rapidly. These two items are useful when displaying a large image as the display of the image will occur much more rapidly for larger increments. Once the display has been satisfactorily defined by the user, the increments can be reset to 1 and the display regenerated using the Display! menu item, or when prompted by the Print menu item. Sun InclinationThis value specifies the value of the inclination in degrees to use when displaying a sun illuminated image. This value is ignored for all other image types. The inclination should be a value between 0 and 90. The value 90 represents the sun being directly overhead and the value 0 represents the sun being on the horizon. Sun AzimuthThis value specifies the value of the azimuth in degrees to use when displaying a sun illuminated image. This value is ignored for all other image types. The inclination should be a value between 0 and 360. The value 0 represents the sun being to the north, and the value 90 represents the sun being located to the east. Image File SpecificationsWinDisp allows up to three image files to be specified. Each of the files can be accessed by selecting the File 1 to File 3 option fields. When a particular file is selected the file name may be changed by directly editing the name in the text box or by double clicking the text box to bring up the image file dialogue box to select the required file. Clicking on the display grid details command button displays the grid details for the currently selected grid file (NB not the merged information when more than one file is specified). For the Grey Scale, Colour, Banded Colour, Real-time Sun illumination and Colour draped Sun illumination image styles the user can specify one to three image files. If more than one image file is selected, WinDisp will generate a merged image from the specified grids using a histogram matching technique for the areas of overlap between the individual grid files. The individual grid files do not have to be of the same format or have the same grid cell sizes nor do the grid cells have to align with each other. However when multiple files are specified, WinDisp will interpolate the second and or third grid file to conform with the first specified file, so there is some overhead in displaying files in the manner. If the merged image is to be used on more than one occasion, the user may like to use the Output Grid File button to actually generate the merged grids into a single grid file. Image File FormatWinDisp can handle the following grid file formats:
When specifying the grid file name the user can also specify the grid file format, however if the format is not supplied, WinDisp will attempt to determine the file format itself. For the binary formats (ERMAPPER, Geosoft Binary and $$BINARY$$) WinDisp automatically detects and handles both UNIX and DOS forms of the grid file. In addition the ERMAPPER and Geosoft Binary format supports 1 byte and 2 byte integer formats. Not all possible options are currently supported in WinDisp (especially grid rotation values), so if a grid file is encountered which WinDisp does not handle try converting the grid file to another form before using WinDisp or send the grid file to John Paine and WinDisp will be modified to support the particular format. Generate HistogramThe command button can be used to generate the histogram information. If the histogram has already been calculated, clicking on this button will have no effect. Recalculation of the histogram can be performed by using the Recalculate Histogram or Reset Histogram menu items available from the Grid Details form. Display Grid DetailsClicking on this button will force the histogram information for the current grid file to be generated if it has not already been calculated. Once the histogram is available, the Grid Details form will be displayed. This form is described above under the Histogram Equalise heading. Output Grid FileGenerate Contours
|
|
Send mail to
john.paine@onaustralia.com.au with
questions or comments about this web site.
|