

![[Company Logo Image]](../images/sphere_smooth.gif)
|
|
|
|
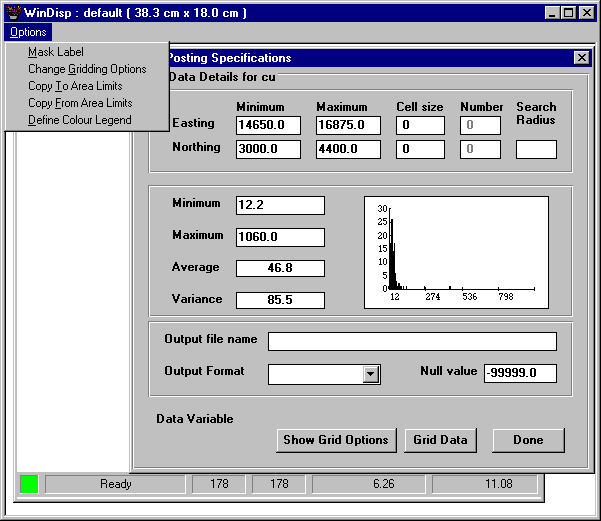
WinDisp Data Range MenuData Range MenuThis form displays the x and y limits of the data read from the file along with various statistics on the data variable itself and a histogram of the distribution of the data. When this form is displayed there are a variety of options available to the user. The main option available to the user is to grid the current data between the displayed area limits using the specified cell size and other grid options (these are explained under Gridding Data).
Note that when the current area of interest and plot scale are defined, the data read from the file are masked to this data area. If the user wishes to determine the full extent of the data in the file, this can be achieved by setting the map scale to zero on the Area Definitions menu, returning to the Posting Definitions menu and then clicking on the display data range button. This action will force WinDisp to reread the data file and accept all data points from the file. The other options available to the user are selected by clicking on the Options Menu item. The available options are: Mask Label Selecting this option specifies that the data value being written as a text item will have the background blanked out. This option allows for posted data to become more legible when posted over contours or images. Change Gridding Options This performs the same function as the Show Grid Options button and is described under Gridding Data Copy To Area Limits Clicking on this menu item results in the current values of the x and y limits of the data being copied to the display area limits. In addition a map scale will be chosen to make the map a reasonable size if the map scale is not already defined. This option allows the user to rapidly set up a map display which encompasses all the data read from the file. Copy From Area Limits When gridding data it may be desirable to restrict the area to be gridded rather than to grid the entire range covered by the data file. This can be achieved by individually setting the x and y limits on this menu or, if the display area limits have already been set to the desired sub-region, by clicking on the Copy From Area Limits button. Define Colour Legend Clicking on this button results in the histogram for the currently selected data variable being used to define the 8 colour ranges on the Colour Range menu. |
|
Send mail to
john.paine@onaustralia.com.au with
questions or comments about this web site.
|